How to facilitate a remote affinity mapping workshop
A detailed guide on how to facilitate an affinity mapping workshop with for a large distributed team
In recent years designers have become more influential throughout organizations. Alongside product managers, they lead the teams by creating good products and services through empathy and user advocacy. But designers can do even more. They can help teams design better products by fostering collaboration. Creating the solution for a problem where designs play a significant role is very important for the product. And you can improve it by bringing other people from your team to the design table. Because usually, two heads are better than one.
A bit of theory: workshops design
When it comes to understanding the nature of collaborative activities, a book called ‘Gamestorming’ is the best book out there. And from this book, I want to share a basic structure of nearly every group activity or how they call it ‘games.’
The goal
How can we get from A to B
What are the questions and hypotheses
What is the outcome
Opening (divergent)
Set the stage, explain the rules
Create as many ideas as possible
Exploring (emergent)
Experiment
Find themes, new patterns
Closing (convergent)
Prioritize
Create action points
Make conclusions
A cool thing about this structure is that you can make a ‘game’ within a ‘game.’ For example, if you have too many participants in your workshop, you can create breakout groups, and these breakout groups will have their own ‘mini-game’ that follows the same pattern.
The problem with other workshop tutorials
While preparing to facilitate workshops in my teams, I found that many tutorials were too theoretical and abstract. I had to figure out the hard part of:
the logistics of managing a lot of participants remotely;
how to make everyone’s ideas heard.
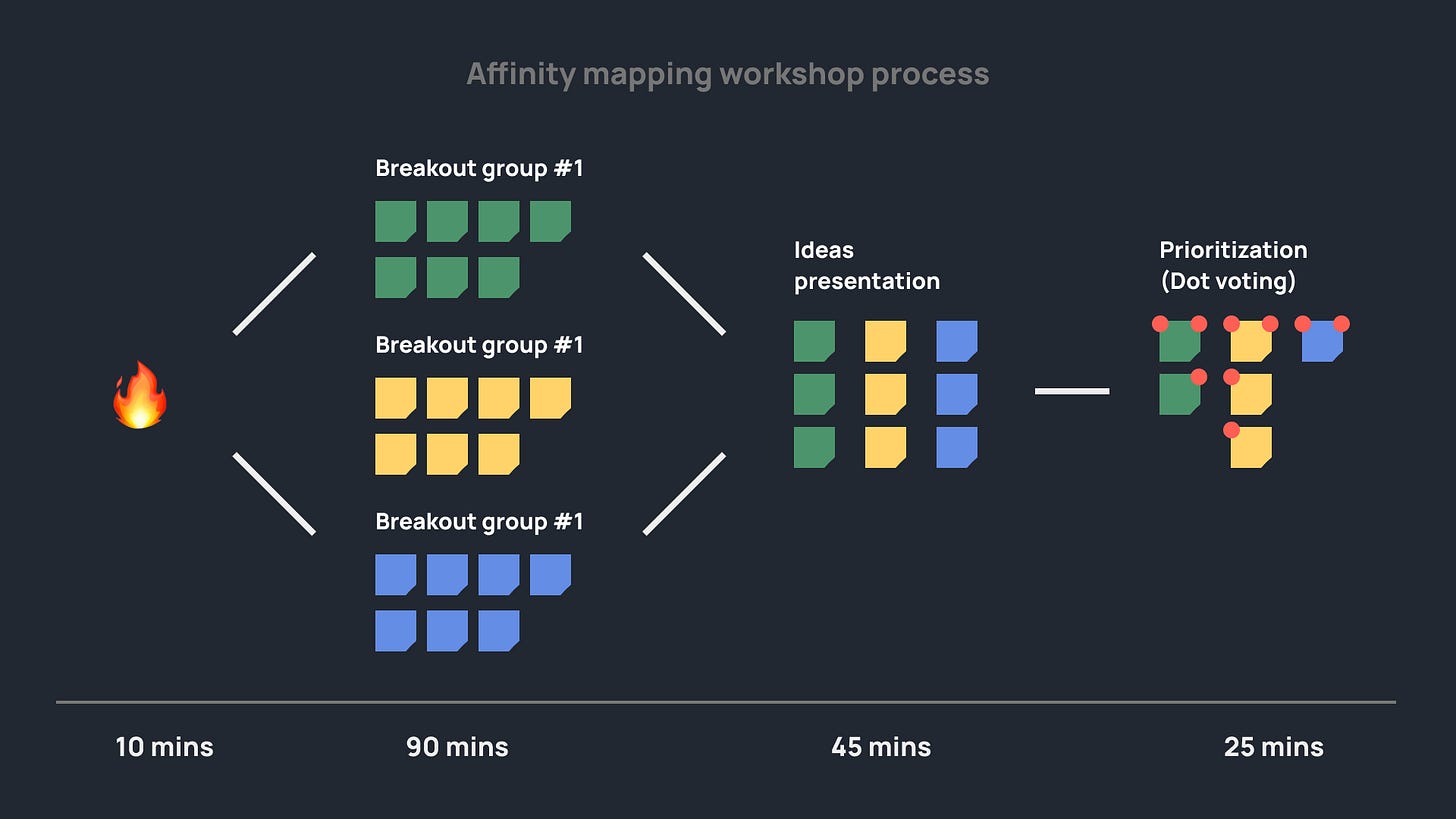
Affinity mapping workshop process
The goals
Generate as many ideas or solutions to a problem as possible.
Align different departments in the team and give them influence over product decisions.
Pre-workshop
The Homework
The key to a productive workshop is preparation. And it relates not only to good preparation from facilitators but from the participants too. From my experience, most people are terrible at generating meaningful ideas in a short time. Their ideas are either too general and mainstream, or they generate too few ideas.
The solution is to give ‘homework’ to the participants before the workshop. Send them an email where you ask them to generate as many ideas as possible. Start with a good ‘fire-starter’ (a term from the ‘Gamestorming’ book I referenced earlier). A good example of an effective ‘fire-starter’ is the ‘How might we….’ question (i.e., How might we help employees stay productive and healthy when working from home?). Emphasize in your email or message that this is crucial to come prepared.
Not only doing homework separately helps create more meaningful ideas, but it can also help to hear the ideas of all participants. As Adam Grant said: ‘When groups meet to brainstorm, good ideas are lost. People bite their tongues due to conformity pressure, noise, and ego threat.’
Figure out breakout groups in advance
If you plan to invite more than 8 participants to the workshop, it’s better to divide people into breakout groups. Breakout groups with participants from different teams and departments generate more diverse ideas. Try to shuffle participants so that there are business stakeholders, backend and frontend developers, designers, etc., in one breakout group. Figuring it out in advance will also save you time during the workshop, so you don’t need to do it on the fly.
Pick breakout groups facilitators in advance
It’s equally important to pick breakout group facilitators because you need to instruct them about the process beforehand. Because facilitating a workshop is not an easy task to do and requires instructions and practice.
Prepare the workspace
To remove the friction regarding logistics, in the online collaboration tool of your choice, prepare a workspace for each breakout group and each participant of the breakout group. For example, you can:
put a ‘fire-starter’ question and some instructions at the top of the board;
set workspace boundaries for every participant;
prepare dummy stick notes.
Big group opening
Further, I will describe a process for a workshop with a few breakout groups. A ‘big group’ is when all the workshop participants gather in one space.
The goal and fire-starter question
Explain the workshop's goal and bring up the main ‘fire-starter’ once again.Explain the process and timings
The general flow: opening, breakout groups work, ideas presentation, prioritization.Divide into breakout groups and introduce the facilitators.
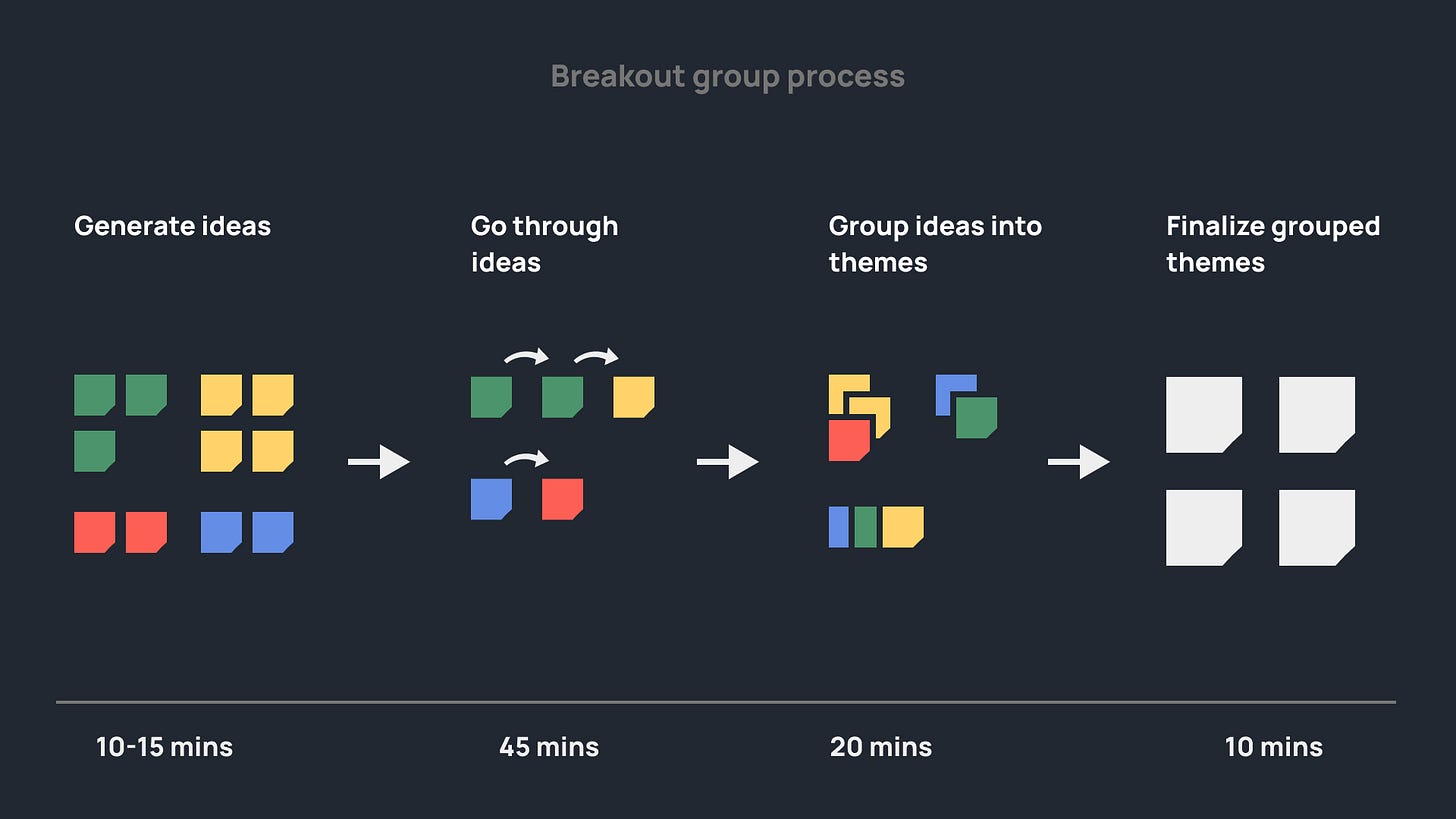
Breakout group opening
The goal and instructions
When a breakout group is created, the facilitator should explain the process inside the breakout group and repeat the ‘fire-starter’ question and all the instructions. The facilitator should also show the workspace and where is the space for each participant. If there is no dedicated space, let participants pick theirs and claim it with their name.
Put down and generate ideas
Allocate 10 to 15 minutes for the participants to put all the ideas they prepared beforehand in a dedicated space. Encourage them to generate more ideas if they have some time left.
Breakout group exploring
The exploration phase, where you find them and new patterns, is the most challenging, especially for remote workshops. Empirically I found two approaches to tackle it. The first relies more on a group; the second relies more on a facilitator.
The first approach
Pick a workspace of one participant from the breakout group
Read the ideas on sticky notes one by one.
If the idea is not self-explanatory, let the participant elaborate on it.
If someone else in the group has a similar idea, ask them to drag the sticky note to the idea being discussed to form a theme. If that person has some supporting comments, let them speak. Add additional stickers if needed.
Name the theme.
Go through all of the sticky notes of the participant you chose first.
Then switch to the sticky notes of other participants and repeat the process until all sticky notes of all participants are discussed.
The second approach
Give a 10-minute break for the participants.
As a facilitator, go through the sticky notes of the people yourself and try to group them into themes.
If there are ideas that are not clear, put them in the parking lot, you will come back to them later.
Name the themes.
After the break, let the participants look through generated themes.
Then go through the themes with the participants and discuss them:
Ask them if they agree with these themes.
Go through parking lot sticky notes or unnamed themes.
Breakout group closing
Read all the themes out loud once again. Decide with a group what ideas are not worth presenting to a broader group. You can ask people or use a prioritization exercise like dot voting. Then decide who is going to present the themes.
Take a break before joining altogether. The facilitator or representative of a breakout group can put themes as separate sticky notes on a ‘Big group’ board.
Big group closing (presentation)
When a breakout group representative presents the themes, Encourage other members to ask questions and participate in the discussion. Be cautious of time; allocate time for the presentation of breakout group work and discussion.
Big group closing (prioritization)
In the workshops, time flows unpredictably, and there is always not enough of it. Hence prioritization, one of the most important things, is always omitted. So if you run out of time, don’t worry. You can set up an additional prioritization workshop. Splitting exploration (generation) and closing (prioritization) stages can be beneficial. The participant can rethink their ideas or come back with fresh ones next time.
Moreover, you can filter ideas because sometimes they are too unrealistic or unrelated. After all, the participant may lack the context of the product or empathy for the users. So you can gather with a smaller group of people who are more familiar with the product, filter those ideas, and even make them less raw. After this, you can gather with a broader group for a prioritization workshop.
Okay, back to the more important stuff. An excellent way to prioritize workshop artifacts is the Dot-voting exercise. Miro has an awesome built-in feature for voting. But you can find a lot of pre-made templates for your online whiteboarding tool. This is Miro's example or Figjam's example.
Awesome, now you have a set of ideas from the whole team. However, making these ideas and insights useful is another challenge. Because they are rarely actionable right away. Even priorities set by the group might not be correct or logical. Everything requires further research and work from product managers, designers, and other stakeholders. Sometimes the results of these workshops might not be useful at all because:
the goals and ‘fire-starter’ questions were ambiguous;
participants didn’t put much effort into preparation;
the team lacks experience in brainstorming and workshops;
the ideas were just bad.
Nevertheless, even a failed workshop is a valuable lesson. Try to do these exercises frequently so your team can build collaboration muscle. It takes time. You will grow as a facilitator and learn how your team thinks and behaves.
Thank you for reading my post till the end; I really appreciate that!
I would like to hear back from you, so if you have any feedback regarding this or other posts; ways to improve; a topic that you want me to write about in the future; or you just want to say something nice or not nice, please feel free to reply to this email.


